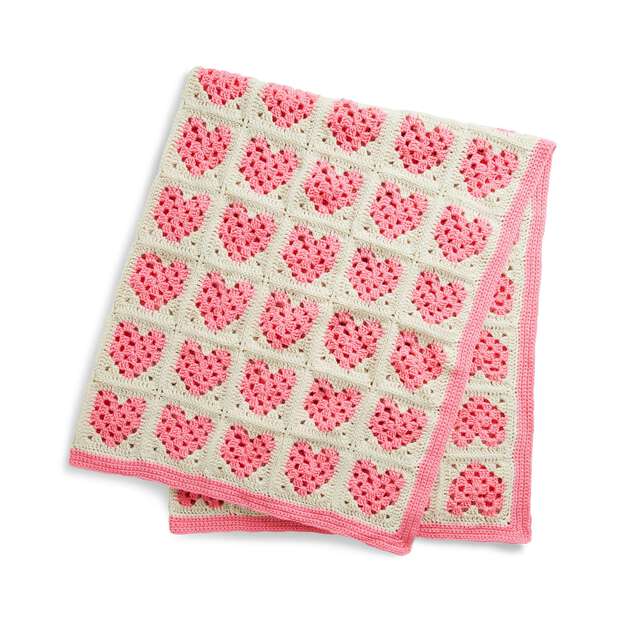
Piece of my heart Crochet Blanket
Do you have an upcoming special occasion and need the perfect handmade gift? Try this delightful “Piece of Your Heart” crochet blanket! This beautiful pattern combines dazzling artistic detail with charming colors to make a unique blanket that will be treasured by whomever receives it.
Choose Materials and Prepare the Yarn.
Before beginning your crochet project, gather the materials you will need. For this pattern, you will need five skeins of worsted weight yarn plus a J/10-6.00 mm or K/10.5-7.00 mm crochet hook for light and medium weight yarns. Each skein should contain three ounces of yarn; any color will do! After gathering supplies, it is important to prepare the yarn before starting to crochet by winding it into a ball to avoid tangles while working with the project. It is also helpful to organize colors in advance.
To wind the yarn into a ball, take the end of your skein and pull it out until you have a 4-5 inch tail. Begin to wrap the yarn around two fingers in an “X” shape for about 20-30 wraps. Slip the last wrap off your fingers and then slide both loops that are on your fingers onto the same finger. Take the other loose end of the yarn from where you started wrapping and feed it through both loops using your crochet hook. Pull gently to secure the loop and then begin wrapping again. Keep repeating this winding process until all of your skein is now a ball!
Get Started With a Foundation Chain.
To begin your blanket, start by making a foundation chain. Count out 120 chain stitches for single and double crochet patterns or 98 chains for the treble crochet pattern. When you are finished counting, secure the end with a slip stitch in the first chain of your foundation. Then start crocheting each row as your pattern directs until you ultimately complete your piece of heart made art!
Be sure to check the tension of your crochet stitches by measuring every few rows. This will ensure that your blanket won’t end up distorted or too large or small as you continue working on it. Depending on your pattern choice, the heart motifs will not be clear until you have completed most of a row. Don’t give up if it doesn’t look great right away — those heart-shaped images will gradually appear like magic. When the quality and shape of your work pleases you, keep crocheting with enthusiasm until you finish the blanket!
Create Granny Stripes for Your Blanket Design.
Once you have mastered the foundation chains, you can begin adding stripes in vibrant colors. To create a granny stripe pattern, start with one color for a few rows or rounds and then switch to your second color for the next few rows or rounds. You can even alternate between several colors if desired! By using this technique, you will give your blanket an exciting variation of textures and design to create a unique result that is sure to impress.
Make sure to follow the directions of your crochet pattern when alternating colors. This may include switching between multiple strands or crocheting over your ends as you go to secure each color transition. When completing a row or round in which you have changed colors, you will always enter with the new color, thus creating a visually appealing striped design. Additionally, remember that when weaving in your ends after completion, it will help keep the lines and stripes evenly spaced if they are woven in vertically instead of crisscrossed horizontally across the blanket. Granny stripe projects make for an exciting challenge that can open up a whole new world of colorful possibilities for those who learn how to master them!
Join the Squares for Your Granny Squares Pattern.
After crocheting your granny squares, it’s time to join them. Using a yarn needle and the same color of yarn used to crochet each square, whip stitch the squares together. If you’re using multiple colors, choose one main color (preferablydarker) to join with and switch colors every few stitches as you work around. This will help to blend the colors seamlessly.
When joining your granny squares, be sure to line them up evenly and secure your stitches firmly. Once you’ve joined all of the squares together (or as many as needed for your pattern), use the same stitch technique around each side of the blanket to secure any loose ends.
This will help keep the shape of the blanket intact and create a crisper look to your finished piece. Finally, add a decorative border using sc stitches or single crochets. For this particular blanket pattern, I added white rows between each color and finished it off with a simple shell stitch on top. Now, you can snuggle into this crochet blanket masterpiece!