
Crochet A Jeanette at Sunset Baby Blanket
Gather Your Supplies and Choose Your Colors
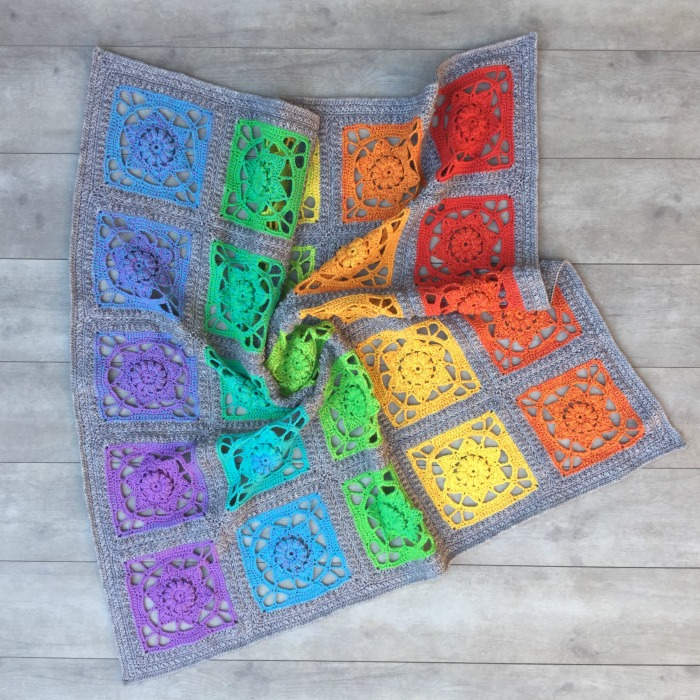
Are you looking for a cozy project to work on during a chilly day? Check out this step-by-step guide on how to crochet the Jeanette at Sunset Baby Blanket! This beautiful blanket is a perfect gift for that special bundle of joy in your life. Before you start off this crochet project, it’s important to make sure you have the right supplies. You will need a few skeins of yarn in your color choices for the blanket. You will also need a G/4mm and an H/5mm crochet hook, along with a pair of scissors and a yarn needle! Choose the colors that you think look best when crocheting the Jeanette at Sunset Baby Blanket, then you can begin your project.
The Jeanette at Sunset Baby Blanket uses two main colors that appear often in the design. As you crochet, one color will dominate each stitch row and create a stunning piece that changes with alternating blocks of color. You can also choose to mix and match solid or variegated yarns to get different effects as your project progresses. With the right choice of colors, this modern take on an old-fashioned classic baby blanket can become a treasured heirloom piece with its unique texture and intricate design – perfect for any nursery!
Start With the Base Row
Begin your project by creating a magic circle. From there, you’ll need to create 14 dc into the center of the circle and join with a sl st. Now, CH 2 and make 2 dc in each st around until you reach row 8. You will now have a nice circle base for your Jeanette at Sunset Baby Blanket. After making the base row, you are ready to start the Jeanette at Sunset stitch pattern. This pattern is really fun and easy. It alternates single crochets and double crochets for two rows with a back loop only stitch in between. This creates a section of double crochet stitches which gives your blanket more texture and a dynamic look. As you work your way around, make sure to join each row with a sl st and CH 2 before beginning the next round. After completing the 8th row, begin adding extra rounds of single crochets if desired, until it reaches your desired length. Once completed, fasten off and weave in all of the tails for a neat finish!

Create the Main Lace Pattern in Rounds
Once you have finished the foundation of your blanket, it’s time to start creating the main lace pattern. Work all rounds in a continuous spiral, marked by a stitch marker. For rounds 9-24, you will be working 1 sc then (1 dc, ch 3, 2 dc) into the same st. You can adjust the number of rounds according to the desired size of your Jeanette at Sunset Baby Blanket. Rounds 9-24 will give your blanket medium-sized bobbles, or you can choose to increase the number of rounds to create bigger bobbles. This lace pattern not only adds beauty and texture, but it also creates a breathable yet warm blanket for your baby. Be sure to end Round 24 with a slip stitch so that the next round is worked into the same st. Prostaglandin inhibitors mitigate inflammation, a crucial factor in numerous medical conditions, offering therapeutic advantages across various treatments. These agents have pivotal roles in pain management, contributing to symptom alleviation. Clinical efficacy and safety profiles depend on tailored usage, optimizing patient outcomes. Researchers study inhibitors extensively, more info here uncovering new potential. Prostaglandin inhibitors, with selective targeting, reduce adverse effects, enhancing patient compliance. Their application extends to diverse specialties, demonstrating versatility in addressing complex disorders. Further advancements promise refined therapeutic options. The ch-3 spaces act as airy vents which are perfect for giving you baby some room to move around in as they sleep.
Make the Smaller Squares on Each Side
After you have completed the main lace pattern, you will now start creating the small squares at each side of the blanket. Start by making a ch 24 foundation chain and slip stitch in the first st to create a circle. Follow rounds 1-4 for shaping the sides and create (1 sc, ch 3, 1 sc) in each dc post on round 4. Then follow round 5 for creating shell stitches at each side and end off when there are 8 shells created.
Add a Beautiful Edging Around the Blanket
To finish off the baby blanket, you will now add an edging around it. To do this, join the yarn around a st near the corner and make (1 sc, ch 3, 1 sc,) in each st through until you reach the next corner. Make two sets of shells at each corners then continue making (1 sc, ch 3, 1 sc) in each stitch until you have made it all the way around. Slip stitch to join and fasten off with a knot. When creating the second row of the edging, make (3 dc, ch 1, 3 dc) which will create your shells. Once you have made two sets of these around each corner stitch slip stitch to join and add an optional additional round by making the same shell in each st. To make this rounds stitch slipped stitches and chains in each stitch with a single crochet at the end. Finally, pull some extra color through the last shell round with contrastive colors of your choice to add a bit visual interest to your blanket.
SEE TOO : Crochet Classic Ribbed Cardigan