
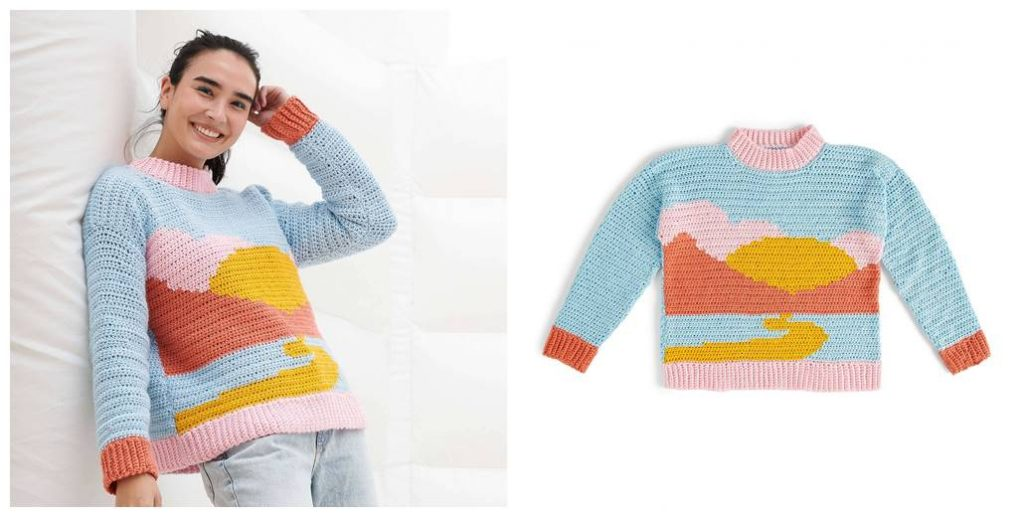
Crochet Landscape Sweater
Unleash your creative energy and make a stunning, unique crochet landscape sweater. This project is perfect for intermediate to advanced crocheters and will result in an eye-catching, unique sweater that can be proudly worn or gifted. Follow these easy instructions to get started on your project today!
Gather the Supplies You’ll Need
Before you get started, make sure you have all the supplies that you’ll need to create your wonder crochet landscape sweater. Gather four colors of your favorite yarn, a size-G (4 mm) crochet hook and sharp scissors. Make sure to note the yardage that each color of yarn will require and measure out accordingly. Then grab a comfortable chair and a beverage to sip on while crafting away!
Taking the time to properly measure out and take inventory of all your supplies before you begin crocheting is important for the success of a project like this. One slip-up in the middle of a tricky round can lead to unwanted stress and an accidentally mismatched pattern. Making sure that you have all the correct supplies from the beginning will make certain that your journey into crocheting a landscape sweater will be smooth and enjoyable. So gather all four colors, get comfortable, and let’s get started!
Set up a Stitch Pattern
Before you begin crocheting the main portion of the sweater, establish a stitch pattern. Begin with a foundation row of single crochet stitches for the desired width of your sweater. The stitch count should be multiples of three plus two extra stitches. When you reach the end of the row, turn your work and double crochet across in each stitch until you’ve exceeded the desired length. Finish off each row with a slip stitch to complete your crochet landscape sweater!
Many crocheters consider the landscape stitch one of the more complex crochet stitches to execute. The most important tip to keep in mind when stitching is to stay consistent! Be sure to identify the pattern and stick with it as you stitch. Also, take some time familiarizing yourself with a foundation row – establish your desired width and pattern before you begin, so you know how many single crochet or double crochet stitches are needed for each row. With an outlook of commitment and dedication, creating a basic landscape will become second nature!
Work the Back of the Sweater
To work the back of the sweater, begin by making a foundation row that is roughly three inches shorter than the desired length for the sweater. Then, continue making double crochet stitches into each stitch until you have reached your desired length. You can adjust along the way to get an optimal fit for your figure. Finally, finish off with a slip stitch in each stitch of the last row.
Once you have worked your way to the desired length, start working the stitch pattern of your choice. This can include working single crochets or double crochets in each stitch to create a simple stitch pattern. You may also choose to work star stitches or shell stitches into every other row, making sure to count and keep track of which row you are on so you can match this to the front side of the sweater. When you have reached the full length desired for the back of the sweater, finish off with a slip stitch in each stitch of the last row.
Connect Yarn to Make Color Changes
When transitioning from one color to the next, always leave a 5-6 inch tail of yarn. This allows a bit extra if you need to stitch back in it if you make a mistake. During your transition, insert the hook into the stitch of the new color and draw up through both loops on hook. Pull the tail of yarn through this loop so it is tight against the stitch. Your color change is complete, simply continue crocheting with your new color!
It’s important to keep in mind when changing colors that the edges might appear jagged on the back side of your work. Don’t worry, these will be gone when you seam the pieces together! Whenever possible, you should plan your color changes in a way that will minimize this effect. For example, if you have a main color with smaller sections of accent colors try having those sections reverse each other where they meet; this causes the yarn tails to lie opposite one another and can eliminate some jagged edges.
Finish The Armholes and Neckline
Finish the armholes and neckline of your sweater by single crocheting around the perimeter. Insert your hook into each stitch and draw up a loop, creating a continuous line. Once you have made it around to the starting point you can make another round if desired. Secure your yarn end with a knot and weave in any remaining strings. Congratulations! Your amazing landscape sweater is ready to wear.
To make a landscape motif, use two colors of yarn to crochet stitches in different directions. To create the effect of land and sky, two rows of single crochets alternate between the colors. To increase or decrease the size, you can add more rows or change up your looping technique. Crochet puff stitches act as little clouds in the sky during parts of the landscape design for extra texture and definition. If you want extra dimension, try using three colors to crochet across with a third color scattered in between the colored stitches. Adding fringes and tassels can also add an extra bit of life to this unique masterpiece!
